

If you're planning a home renovation project that involves tiling, grouting is a crucial step that can make or break the final outcome. Properly applied grout enhances the aesthetic appeal of your tiles and ensures their longevity and durability.
However, grouting can be a daunting task, especially for beginners. The good news is that with the right tools and techniques, anyone can master the art of grouting and achieve professional-looking results for your floors.
In this ultimate guide, we'll take you through the step-by-step process of applying grout, from preparing the surface to sealing the finished product. Whether you're a DIY enthusiast or a professional contractor, this tutorial will equip you with the knowledge and skills you need to achieve a flawless grout application every time.
So grab your tools, and let's get started on this exciting journey to a beautifully tiled space!
Types Of Grout
Grout comes in two main types: sanded and unsanded. Sanded grout is used for larger joints, typically over 1/8 inch, and is a mixture of cement, sand, and other additives. Unsanded grout is used for smaller joints, typically under 1/8 inch, and is a mixture of cement and other additives.
When selecting grout, consider the color of your tiles and choose a grout that complements them. You can also choose between a standard or epoxy grout. Standard grout is easier to work with and is suitable for most tiling projects. Epoxy grout is more durable and resistant to stains and chemicals, making it ideal for high-traffic areas.
Preparing The Surface For Grouting
Before applying grout, it's essential to prepare the surface properly. Start by ensuring that your tiles are clean and free of dust and debris.
Use a vacuum cleaner or a damp cloth to remove any dirt or residue. Next, inspect your tiles for any cracks or chips and replace any damaged tiles before grouting. If you're working with new tiles, allow them to set for at least 24 hours before grouting.
This will ensure that the adhesive has fully cured and that the tiles are firmly in place. If you're working with existing tiles, remove any old grout using a grout saw or a rotary tool. This will create a clean and even surface for the new grout.
Clean Your Surface
First things first: Make sure your surface is clean. Before beginning any grouting job, it’s important that you make sure your surface is free of dust, dirt and other debris.
This will ensure proper adhesion of the grout as well as prevent any issues with staining or discoloration in the future. You may want to use a vacuum or mop to remove loose particles before starting.
Grout haze can also be an issue, so make sure to remove any leftover residue from the tile before you start. Grout tile is typically used to fill in the gaps between tiles, and therefore needs to be applied carefully.
Mixing The Grout
Mixing the grout is a crucial step in the grouting process. Follow the manufacturer's instructions carefully and mix the grout in a clean bucket using a mixing paddle.
Start by adding water to the bucket and then gradually add the grout powder while stirring continuously. Avoid adding too much water or too much grout powder, as this can affect the consistency of the grout.
Once the grout is mixed, allow it to rest for 5 to 10 minutes before using it. This will give the grout time to hydrate and become easier to work with. Avoid mixing too much grout at once, as it can dry out before you have a chance to use it.
Get The Proper Consistency
Next, mix your grout to the proper consistency. This may vary depending on the type of tile floor and material you’re working with and the size of your tiles, so be sure to read up on specific instructions for your project.
For most types of installations, a standard pre-mixed grout will work perfectly fine – just add water according to package instructions until it reaches a creamy texture that isn’t too thick or runny.
When you mix grout, you’ll want to use a rubber float or trowel to spread it evenly over the tiles. Make sure you work in small sections and use an up-and-down motion while avoiding any back-and-forth motions that could disturb the tiles.
Applying The Grout
Now it's time to apply the grout. Start by spreading the grout over the tiles using a rubber float. Hold the float at a 45-degree angle and work the grout into the joints, ensuring that they are completely filled. Use a diagonal motion to spread the grout evenly and avoid leaving any gaps or voids.
Once you've applied the grout, use a damp sponge to wipe away any excess grout from the tiles. Rinse the sponge frequently and avoid using too much water, as this can weaken the grout. Once you've removed the excess grout, allow the grout to dry for the recommended time.
Use A Rubber Grout Float For Application
Once your grout is ready, use a rubber grout float to apply it evenly over the entire surface. This tool will help you get into tight spots and make sure you don’t miss any areas while spreading out the mixture.
Start from one corner and move across the room, making sure to fill in any gaps or cracks. Grouting tile is a crucial step in the installation process, and it’s important to do it right. With some patience and practice, you’ll be able to get the perfect finish for your tile flooring.
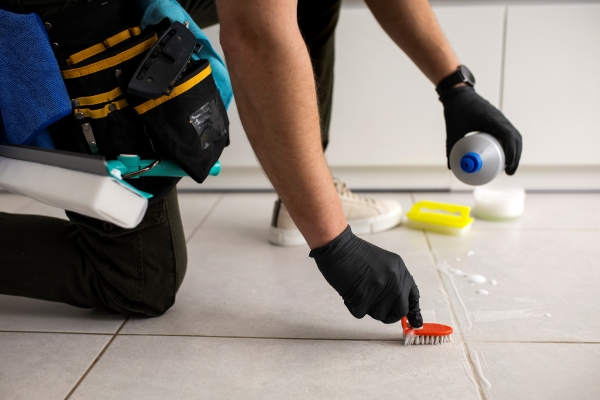
Cleaning Excess Grout
After the grout has dried, you may notice a haze or residue on the tiles. This is caused by excess grout that wasn't removed during the cleaning process. To remove the haze, use a dry cloth or a haze remover solution, following the manufacturer's instructions carefully.
Avoid using abrasive cleaners or tools, as these can scratch or damage the tiles. Once you've removed the haze, allow the grout to dry completely before proceeding to the next step.
Grout lines should be sealed to prevent staining and discoloration. Use a sealant specifically designed for grout and apply it according to the manufacturer's instructions. Allow the sealant to dry completely before walking on your newly grouted floor.
Wipe Excess Grout
Take your time and once you’ve finished, use a damp sponge to wipe away any excess tile grout from the tile surface. Again, be careful not to miss any spots as this will affect how strong your final installation is.
Allow the grout to dry for at least 24 hours before walking on it – though it may take longer depending on humidity levels and other factors. If you have a wall tile, let the grout set for about 15 and then use a damp sponge to clean up any excess grout.
Sealing The Grout
Sealing the grout is an important step that will protect it from stains, moisture, and other forms of damage. Allow the grout to dry for at least 24 hours before sealing it. Choose a grout sealer that is suitable for your type of grout and apply it using a small brush or roller.
Ensure that the sealer is applied evenly and that all the grout joints are covered. Allow the sealer to dry completely before using the tiled surface. It's recommended to reapply the sealer every six months to maintain its effectiveness.
Tips For A Successful Grouting Experience
- Always wear safety gear, including gloves and eye protection, when working with grout.
- Keep your work area clean and tidy to avoid any accidents or spills.
- Mix the grout in small batches to ensure that it doesn't dry out before you're ready to use it.
- Use a grout release agent to prevent the grout from sticking to the tiles.
- Avoid applying too much pressure when spreading the grout, as this can cause it to crack or chip.
- Use a grout caulk to fill any gaps or cracks between the tiles and the walls or floor.
- A putty knife can be used to help you spread the grout evenly across the surface.
Troubleshooting Common Grouting Problems
- If the grout is too dry, add more water and mix it again.
- If the grout is too wet, add more grout powder and mix it again.
- If the grout is cracking or chipping, it may be due to improper mixing or application. Remove the damaged grout and reapply it.
- If the grout is discolored or stained, it may be due to exposure to moisture or chemicals. Clean the grout thoroughly and reapply the sealer.
- A grout removal bit can remove excess grout from the tile surface.

Conclusion
Grouting is a crucial step in any tiling project and requires careful preparation and attention to detail.
By following the steps outlined in this ultimate guide, you can achieve a flawless grout application and ensure the longevity and durability of your tiled surface. Remember to choose the right type of grout, prepare the surface properly, mix the grout correctly, and apply it evenly.
Don't forget to clean excess grout and seal the grout to protect it from damage. With these tips and techniques, you'll be able to achieve professional-looking results and enjoy a beautifully tiled space for years to come.

Connect with us
Recent Posts

WANT 10% OFF YOUR FIRST ORDER?

5 comments