

Are you considering concrete for your next commercial flooring project? Concrete is an economical, durable, and versatile building material.
Concrete finishing may look easy, but it's difficult unless you've done your homework. It's impossible to practice pouring concrete and finishing techniques except on real concrete.
Keep reading as we discuss the tools and techniques required for a durable concrete finish. No matter the size of your slab, the following steps will guide you through the finishing process.
Tools Required to Finish Concrete
Before you pour concrete and begin the finishing process, ensure you have the correct tools. Here's what you'll need for the job:
- Rubber gloves
- Broom
- Come-along or square shovel
- Screed or straight 2x4
- Concrete groover
- Edging tool
- Fresno or steel trowel
Once you have the necessary tools, you can move forward with your project.
Safety Equipment
Concrete is a harsh material that can cause third-degree chemical burns if you're not careful.
To protect yourself and those assisting you with your project, take the following steps:
- Wear adequate eye protection
- Wear long sleeves and long pants to protect your skin
- Wear rubber boots if you plan to wade in wet concrete
- Wear rubber gloves
- Remove any clothing that becomes saturated in wet cement, then thoroughly rinse your skin before going back to work
Acquiring proper safety equipment is essential before concrete pouring and finishing.

1. Prepare the Site
Before you can pour concrete, you must contact your local building department to determine whether you need a permit.
To indicate the corners of the new concrete slab, drive-in four stakes and use a line level to ascertain how much the ground slopes.
Keep in mind that you will have to move tons of soil to flatted a sloped site. You'll have better luck if your slab is built on solid soil. The concrete will undergo less movement and cracking.
If you can, scrape off the topsoil and sod and add gravel if needed. If you come across loam soil or clay, you must remove enough of it to allow a 6-8 inch layer of gravel under your new slab.
Consider hiring an excavator or renting a skid loader if you have more than a few inches of dirt to remove or need to get rid of excess soil.
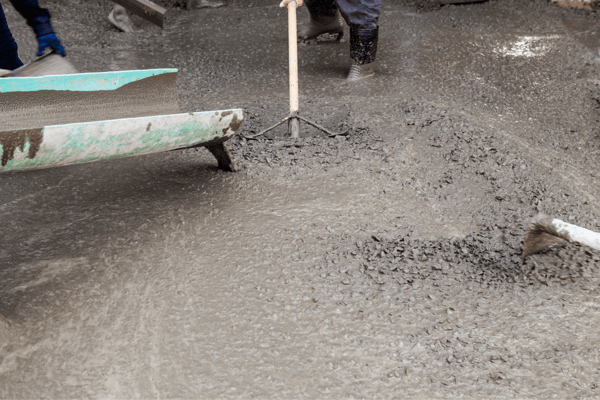
2. Pour and Level
Next, pour the concrete. Only compress the concrete if necessary. These days, most concrete mixes don't need to be tamped or compressed before finishing. Plus, you risk weakening the slab if you tamp the wrong mix.
If you're unsure, confirm with a professional before deciding to tamp. If you do compress the concrete, press it down using a tamping tool.
Drag a screed board (straight 2x4) across the top of the concrete forms to level the slab. Your goal is to create an evenly-filled, flat area, making multiple passes across the top if needed.
It's best to have a helper position themselves in front of the screed as you add or remove concrete.
3. Flatten With a Bull Float
Now it's time to start the finishing process. Immediately after leaving, prepare the slab further using a bull float.
A bull float is a long-handled tool that builders use to flatten holes and ridges in concrete. It also helps embed aggregate particles further, which creates a smoother consistency for more meticulous finishing.
Next, move the tool back and forth across the concrete slab. Move the bull float in whichever way is perpendicular to how you moved the leveling board.
To create a smaller cutting edge of contact, slightly lift the leading edge and lift the tool away from you while pulling and toward you with pushing. You can find bull floats with handles to aid in this process.
Bleed water may surface like your concrete sets—almost all fresh concrete bleeds this way. So, wait for this water to evaporate before moving on to the next steps. How long this process takes depends on temperature, humidity, wind speed, and concrete mix.
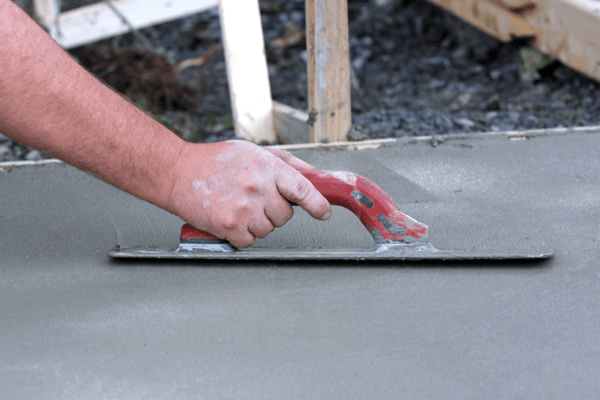
4. Finish by Hand
Now it's time to take your hand trowel and begin smoothing out the concrete surface. You'll use the same motion as in the step before. Don't press down too hard as you tilt the leading edge.
At this point, you can choose your finish. You can choose a broom or trowel finish, or you may choose a decorative finish like polished concrete.
A trowel finish leaves a nice, slick surface. It's attractive but can become slippery and hazardous when it gets wet.
A broom finish produces a rougher result. You might prefer a more rugged aesthetic that is slip-resistant. For commercial footpaths, this is the preferable option. If you choose a medium or stiff brush, you will leave marks behind, increasing the slab's slip resistance.
5. Wait for Concrete to Cure
Now it's time to wait for your new concrete slab to cure. Concrete is incredibly durable, but it takes time to reach optimal strength. It depends on your mix, but most have a cure period of 28 days. You will likely be able to walk on your slab within 24 hours of application.
To cure concrete, you must maintain moisture in the concrete to continue the hydration process.
6. Apply a Sealant
Once your concrete is fully cured, apply a sealant to protect it from the elements. Sealants also make the concrete easier to clean.
All sealants are different, so read the directions to determine how many layers to apply. Wait for this sealant to dry before walking on the slab fully. It's best to avoid driving on the slab for a few days after you finish sealing.
If you plan to polish your concrete slab, complete this process before applying a final layer of sealant to finish the job.
.jpg?width=600&height=336&name=Josh%20Payton%20Twin%20Cities%20Garage%20Experts%20IMG_0052%20(1).jpg)
Start Your Concrete Finishing Project Today
To achieve a shiny, smooth surface, you must put some effort into the concrete finishing process. Not only do you need to float and trowel your slab correctly, but you must give it a good mechanical polish if that's the finish you're after.
Following these steps will leave you with a concrete surface to be proud of. If you need help selecting the right tools for your project, check out our collection today.

Connect with us
Recent Posts

WANT 10% OFF YOUR FIRST ORDER?

8 comments