

Concrete is commonly used for various types of flooring, including driveways, patios, and indoor floors. Over time, concrete surfaces can become rough, uneven, or develop cracks. Sanding helps to smooth out these imperfections and create a polished concrete finish.
As we dive into this comprehensive guide about sanding concrete, we will explore the tools, techniques, and tips to refine your next concrete endeavor, whether it's creating a new patio, renovating your garage floors, or crafting a bespoke sanded concrete masterpiece.
Understanding Concrete Sanding
Before we get our hands dirty, let's understand the “why” behind sanding concrete. Concrete sanding is crucial for several reasons: to level uneven surfaces, remove imperfections, and prepare for additional treatments such as staining or sealing.
Different concrete surfaces have varying levels of hardness, thus posing unique challenges. Rough outdoor surfaces, for instance, would require a different approach from smooth indoor pavements. The sanding process smoothes out the peaks and valleys of the concrete, ensuring a uniform look and improving durability over time.
Safety Precautions
As with any DIY project, safety should always be a top priority. Make sure to wear protective gear such as goggles, earplugs, and a dust mask when working with concrete and power tools. Additionally, make sure to unplug or turn off the power supply before starting any work.
A Step-by-Step Sanding Concrete Masterclass
Each of these steps takes you closer to a beautifully sanded surface. Let's break down the process further.
Step 1: Preparation Is Paramount
Preparation paves the way for a successful sanding operation. Start by clearing the area of any furniture, debris, or loose concrete pieces. Cover any adjacent surfaces that you do not intend to sand with a plastic sheet.
Additionally, it's important to address any significant damage. Large cracks or areas with crumbling concrete will need to be filled and repaired before sanding can begin.
Step 2: Choose the Right Grit
Selecting the right grit is akin to choosing your artist's brushes. You need to consider the hardness of your concrete, its condition, and the type of concrete finish you want. Typically, you'll need a coarse grit to start and gradually work your way up to finer grits for a polished finish.
How Do I Ensure I've Picked the Perfect Grit?
- Test Area: Start by testing a small area to determine the appropriate grit for your surface.
- Determine Hardness: Use a Mohs hardness kit to gauge the hardness of your concrete. Harder surfaces will require coarser grits.
- Assess Condition: If your surface has significant imperfections, you may need to start with a coarser grit.
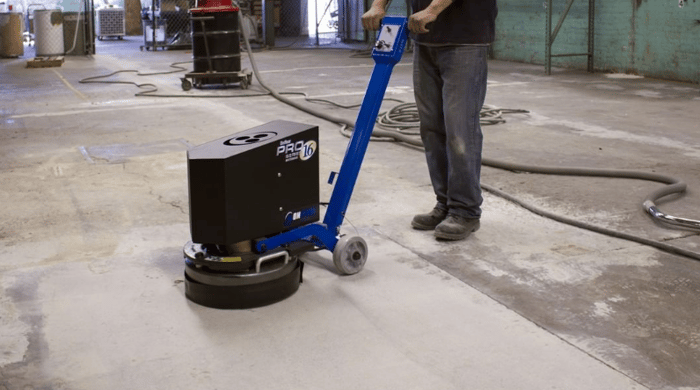
Step 3: Time to Grind
With your safety gear on, proceed with grinding your concrete floor. Move in a side-to-side motion, overlapping each pass slightly until you cover the entire area. If you're working on a larger surface, break it down into smaller sections for better control.
Tips for Effective Grinding
Here are some tips to keep in mind while grinding:
- Go Slow: Take your time and don't rush through the process. This ensures an even grind and reduces the risk of damage.
- Maintain Consistent Pressure: Apply consistent pressure throughout the pass to avoid uneven results.
- Keep the Grinder Moving: Avoid dwelling on any one spot for too long to prevent over-grinding and potential damage.
Step 4: Rinse and Repeat
Once you've completed grinding, rinse off the surface to remove any leftover dust or debris. If necessary, repeat the process with finer grits until you achieve your desired finish.
Step 5: Finishing Touches
After the final sanding, it's time to clean up and add any finishing touches like sealing, staining, or buffing. This step is crucial for protecting your concrete surface and enhancing its appearance.
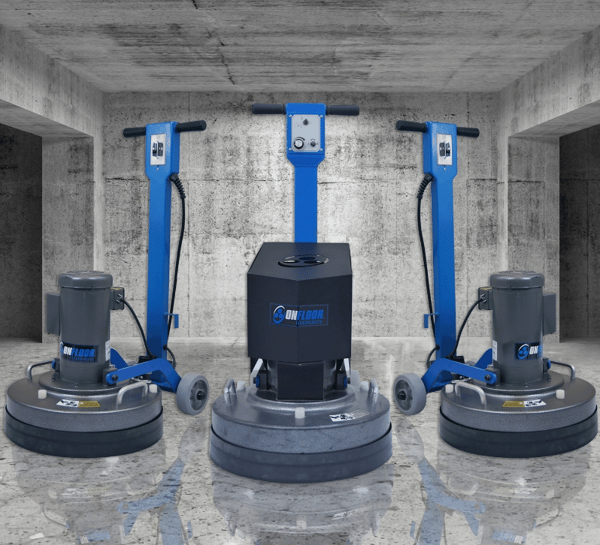
Did you know Onfloor's quick tool-changing machines are capable of switching between grinding and polishing in minutes? For polishing and sanding projects, we recommend the Onfloor OF16Pro.
Tips and Tricks for Concrete Sanding Success
While experience is the best teacher, these tips can also guide you through sanding concrete potential pitfalls.
Avoid Common Mistakes
- Not Preparing the Surface: Skipping out on proper preparation can lead to a subpar finish.
- Starting with a Fine Grit: It's always better to start with a coarse grit and work your way up. Starting too fine can damage the surface and prolong the process.
- Neglecting Protective Gear: Safety first! Always wear protective gear when sanding concrete.
Conduct Test Runs
Before tackling a large project, always conduct test runs on small, inconspicuous areas to ensure the desired result. This will also allow you to adjust your techniques or equipment accordingly.
Know When to Seek Professional Help
If the project proves to be too large or difficult, don't hesitate to call in a professional. They have the expertise and specialized equipment to ensure a flawless finish.
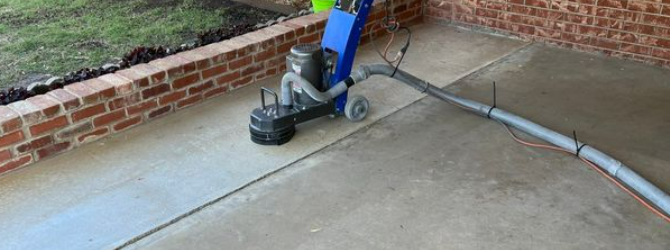
Be Mindful of Dust Control
Sanding concrete creates a significant amount of hazardous concrete dust. Use a dust collector or vacuum with a HEPA filter to minimize the health hazards and keep your workspace clean.
Troubleshooting Common Sanding Issues
Even with careful preparation and execution, issues can still arise during the sanding process.
Here are some common problems and how to tackle them:
Hazy or Cloudy Finish
This could be due to using too high of grit or not changing to a finer grit gradually. To fix this issue, go over the surface with a lower grit before continuing.
Uneven Surface
This could be caused by not sanding evenly or not overlapping each pass. Double-check your technique and overlap each pass by 50 percent for a consistent surface.
Deep Scratches or Gouges
If you encounter deep scratches or gouges, start with a lower grit to level the surface before continuing with finer grits.

How Can Onfloor's Machines Help?
Onfloor's grinding and polishing machines are designed with versatility, efficiency, and precision in mind. With quick tool-changing capabilities, you can seamlessly switch between grits for smooth and efficient sanding. From residential to commercial projects, Onfloor has the perfect machine for you.
FAQs
Can I sand concrete with a regular sander?
No, you will need a specialized concrete floor grinder with concrete polishing pads for effective results.
How long does it take to sand a concrete surface?
The time it takes to sand a concrete floor surface depends on the size and condition of the area, as well as your technique. It can range from a few hours to a full day for larger projects. However, with Onfloor's efficient machines, you can significantly reduce the time and effort required.
Do I need previous experience to sand concrete?
While prior experience can be helpful, it is optional. With proper preparation and equipment, anyone can successfully sand concrete surfaces.
What Onfloor machine is best for this project?
Onfloor offers various machines for grinding and polishing concrete surfaces, each with its own unique features. For smaller residential projects, the Onfloor 16 is a popular choice due to its compact size and ease of use. For larger commercial or industrial projects, the Onfloor 30 is a powerful option that can handle even the toughest concrete surfaces.
How can I prevent dust from sanding concrete?
Using a dust collector or vacuum with a HEPA filter can significantly reduce the amount of dust produced during sanding.
Is it necessary to wear protective gear when sanding concrete?
Yes, wearing protective gear such as safety glasses, gloves, and a dust mask is crucial for personal safety.
What is the benefit of using Onfloor's quick tool-changing machines?
Onfloor machines allow for a quick and easy switch between grinding and polishing, thus saving time and effort during the sanding process.
Can I use a concrete grinder to remove paint or adhesive from concrete surfaces?
Yes, a concrete floor grinder with a diamond-grit grinding disc can effectively remove paint or adhesive from concrete surfaces. For surface prep, we recommend the Onfloor 20Pro.
Do I need to sand concrete before staining or sealing?
Yes, sanding the surface will ensure a smooth and clean surface for better absorption of stains or sealants.
Are Onfloor machines suitable for DIY projects?
Yes, Onfloor machines are designed for both professional and DIY use. Our machines are user-friendly and can help achieve professional results.
What are the benefits of sealing concrete after sanding?
Sealing helps protect concretes surface from stains, spills, and damage and enhances its appearance. A concrete sealant is highly recommended for long-term durability.
Is sanding concrete a messy process?
Yes, it can be messy due to the dust produced by grit sandpaper. It is important to have proper dust control measures in place and clean up thoroughly after sanding.
Conclusion
Sanding concrete may seem daunting, but it can be done efficiently and effectively with the right preparation and equipment. Remember to always prioritize safety, conduct test runs, and seek professional help if needed.
Onfloor machines are designed to make the sanding process easier and produce professional results for both residential and commercial projects. With proper care and maintenance, your concrete floors and surfaces can stay in top condition for years to come.
Connect with us
Recent Posts

WANT 10% OFF YOUR FIRST ORDER?

0 comments