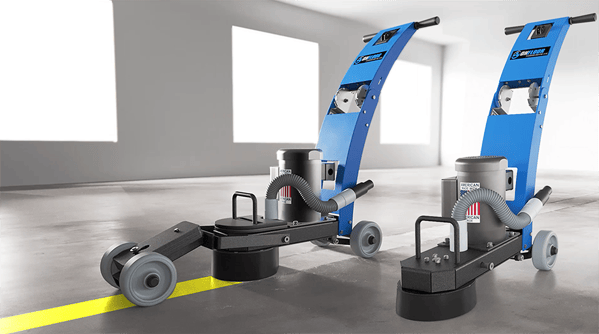
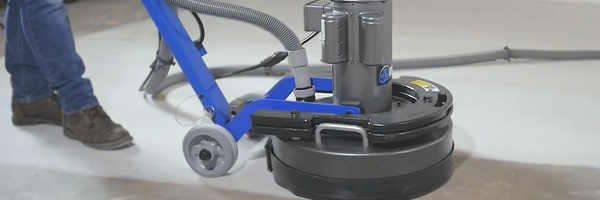
Many concrete floor grinding and polishing projects start with a question: "Can we rent the equipment, or do we need to buy our own?" Well, if you follow our process carefully, you might be able to grind your floors. This article tells you how.
First, let's define what is meant by grinding. Grinding is when an abrasive wheel "removes material from the substrate surface to shape, texture or profile it." Abrasive wheels are used with either water or oil as a lubricant to help them cut.
Grinding is done in stages. Each stage leaves a smoother surface than the previous one, requiring less work to achieve your desired results. Start with coarse grinding and progress through finer and more refined stages until you reach your desired results. Use specific diamond tools to complete the entire process.

Necessary Preparations Before Grinding Concrete Surface
A concrete floor grinder is a perfect way to remove minor surface flaws and paint damage. Machines do the job in half the manual labor time while providing previously impossible uniformity to attain by hand.
The process involves moving an abrasive disk or drum over the concrete's surface and water fed down at high pressure, which acts as a coolant and lubricant.
The key to successfully polishing a floor is knowing what kind of machine you'll need, how it works, and what preparations must first be done on the surface.
Step 1
There are numerous reasons why concrete may become pitted or stained from years of use. Surface preparation is an essential part of the grinding process. A coat of commercial concrete or epoxy coating can be added to seal and protect the concrete before grinding. These coatings are available in many colors, but adding them will increase costs slightly since they aren't always necessary for floor restoration purposes.
Step 2
Cleaning your floor can be done using a high-pressure wash with nozzles specifically designed to remove embedded grime. Make sure it goes all the way through into the sub-floor.
Step 3
If you want to protect your floor from future traumas, it's best to clean large scratches and fill them with commercial patches. Epoxy fillers work well for filling larger holes or cracks.
Step 4
Rent a floor sander from your local rental store that will suit your needs. They come in 8 inch, 10 inch, and 12-inch disks with different grits of sandpaper - 40, 50, 80, 100, 120. Make sure the machine can operate with a pole and handle, as this will allow you to use it for many years.
Step 5
The machine should have a water hookup that sprays down at high pressure upon the concrete surface. Ensure that the unit can spray out enough water to cool both itself and your abrasives before using it.
Step 6
To prevent the disk from gliding over jagged pieces of aggregate or other materials that aren't part of the concrete's surface, use a wire brush to remove them ahead of time. Doing this is crucial for keeping your machine safe and prolonging its lifespan.
Ways to Grind Concrete Floor
The flagstone floor in your old farmhouse is covered with a fine layer of concrete, and after years of foot traffic, it's time to restore the beauty and original character. Concrete grinders are not designed to take out nicks and gouges, so take care not to grind too deeply into the stone.
Keep your grinder moving at all times to avoid burn marks and hot spots. Be sure you wear protective eye gear, gloves, and a dust mask whenever grinding concrete dust or polishing concrete.
Clean The Entire Floor Before Grinding
Before you begin grinding, take care of any loose material such as dirt or flaking paint that might be on the floor by sweeping it away with a strong push broom. You can also use a concrete degreaser such as TSP (tri-sodium phosphate) to help break up any grease and oil that might be on the floor.
Use the Right Type of Abrasive
Grinders typically come with many different types and grits of grinding disks or pads for various applications, but if you want to grind a concrete floor, you'll need to use 36-grit disks or pads. The higher the number of grit, the finer and smoother it will be.
Also, be sure to maintain a slow pace during grinding to avoid swirl grinding passes. Again, ensure that the grinding passes overlap as close as possible.
Protect Yourself and Others From Flying Chips and Dust
Wear protective eye gear and gloves whenever grinding anything. Since concrete is very hard, even soft concrete can cause serious injury if it flies off the floor at high speed. The dust created when grinding concrete is highly alkaline, so use a respirator to protect yourself from breathing it in.

Grind In Small Areas at a Time
Since concrete is so hard, if you try to grind too much area at once, your grinder disks will heat up quickly and burn out faster than normal. Start with a small area, say 2′ × 3′ or so, and work your way across the floor. Use enough disks to do most grinding in one pass before changing them out so they don't overheat.
Avoid Overheating the Floor
To keep concrete from getting too hot while you're grinding it, keep it slightly wet and move your grinder around frequently. Keep the disk moving at all times to avoid hot spots, and if you do see a hot spot, slow down briefly until it cools off.

How Much Does It Cost To Grind The Concrete Floor?
While many people think that commercial contractors only do concrete polishing to create a high gloss polished look in retail or industrial settings, it can be used in homes as well for all the same reasons.
Before we start, we need to define the work we will do and how much is required. There are significant differences in how to grind a concrete floor. Wet grinding is more economical whenever you want to start grinding.
Grit
The coarseness of fineness is used on a surface. The grit number determines its job: coarse/fast removal or fine/slow removal.
100 - Demolition and amp; old coatings
80 - Slight surface scaling (remove Top small layer)
60 - Surface dusting or removing old paint (not for complete removal). Use 80 grit first if needed to remove paint film. It is possible to go up in grits, but you will go through more pads, and it can be costly and time-consuming.
100 grit is the lowest you should go unless there are major surface defects, in which case we recommend starting with 80 to remove old paint and top coatings (this provides a better bond for the new floor coating). We recommend 100 grits when grinding concrete floors. If your floor does not need it, do not use it.
Pros
It dramatically reduces the amount of dust in the air and on surrounding floors and surfaces, including neighboring homes and businesses. (The concrete will be cleaned and sealed.)
Cons
A high level of noise produced during the grinding process can lead to complaints from neighbors.
The process may require other companies to close, limiting business for those companies that don't have the proper permits.
Why Should I Grind The Concrete Floor?
There are several reasons why a woodworker might want to grind concrete floors. The main one is to produce a smooth, even surface for the application of finishes such as waxes, acrylics, and epoxy flooring systems.
In the case of commercial shops, grinding may be necessary as part of maintenance or building repairs. Large production areas may need to be re-grouted regularly.
Another reason why concrete floors are ground is restoration; this can involve removing old finishes such as heavy paints or epoxy coatings. It may be necessary to repair cracks or worn patches.
The Benefits Of Doing Concrete Floor Grinding
There are many benefits to grinding the floor. It is a cost-effective way to resurface your existing floor, making it look brand new. It has much more impact than applying cement paint or other topical coatings.
Concrete grinding not only refaces your concrete but also adds an anti-slip surface to the overall exterior, making it safer for everyone that uses it regularly.
Concrete Floor Grinding is not just for outside use but can also be done on an indoor floor to give it a fresh look and much-needed renewal. A concrete grinder is an answer for those whose concrete floors have become dull, stained, chipped, or cracked.
You will ensure that your new floor lasts longer with this process. The process can also renew tiles, pavers, and blocks. A finely densified, smooth, and polished concrete floor looks ravishing, no doubt.
Once the grinding is done, you can do any finish or seal required. You may need to apply an epoxy grout coat, color hardener, or polish it. Grinding the excess paint and decoration off of the front surface of a concrete floor will extend its life expectancy.

Which Color Should I Choose?
When choosing the color of your concrete hardener epoxy, you need to consider several factors. One of the most important things to think about is who will be using this space and how much traffic it sees.
If it's someone's garage or workshop, you will want something durable and can withstand impacts. You may wish for a more neutral color tone, like the grey hardener or something bright that looks good to you.
The darker colors are also more likely to get hot during the summer months, increasing the room's temperature. Still, they will retain heat during winter, making it warmer than other concrete coatings. For example, if you live in a place that experiences very hot summers and cold winters, you probably want to think about using a lighter color on your flooring. The epoxy coating makes the entire concrete floor look amazing.
You can also mix colors more easily when doing this on your own without having specific equipment or expertise. For example, if you are trying to match the color of the walls in your house, you may want to go for a lighter color. Darker colors make things look smaller; therefore, it might be better to avoid dark colors if your floor is already relatively small.
What Other Elements Should I Think About?
The thickness of your concrete flooring can also affect the type of epoxy that you will need to use. If your floor is thick, you might be better off using epoxy formulated for thicker floors because it will cure faster and harden more quickly than others.
They will most likely have mortar joints between them if you are doing this outside on pavers or concrete blocks.
When applying an epoxy coating, you will want to use a solvent-based one. If your paver joints are huge, this choice might not be the right one for you because the water in it will pool on top of the larger joints and could cause more damage than anything else. You may need to try using an epoxy made specifically for these types of applications.
Conclusion
We all know that grinding a concrete floor is messy and challenging work. It's also time-consuming and requires specialized equipment. But, with the right tools and techniques, you can grind your flooring to perfection!

4 comments