

Wood floors take quite a beating, from shifting furniture to high heels to children's toys. Tough as wood surfaces might be, their finish is still prone to scruffs and scratches. Fortunately, resurfacing (also known as refinishing or refurbishing) can adequately remove signs of wear and tear.
If you're looking to resurface or redo your wood floor, the first step is to make sure you have the proper supplies- paint, tools, commercial-grade equipment, to name but a few.
Onfloor Technologies uses an innovative process to help any flooring company in the US learn how to resurface the wood floor properly. From restoring worn-out kitchen floors to replenishing wood decks, we offer wood floor sanders, edgers, and vacuums to get the job done at varying speeds for a line-up of different applications.
Below, we have compiled a guide on how to resurface wood floors (using the right equipment).
What are the Steps in Resurfacing Wood Floors?
Cleaning the Floor
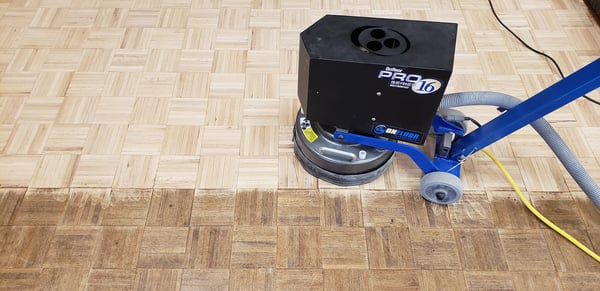
The floor must undergo a thorough cleaning before resurfacing. It should be vacuumed or swept to remove any dust or debris that might be present completely. If you are unsure which equipment to use, try the multi-purpose Dynavac Pro 1600IC Cleaner Vacuum, boasting an automatic filter cleaning system. It also functions as a dust collector, which leaves every floor area spotlessly clean and dust-free.
Once you've cleaned all spots of the wood floor, gently wipe it with a towel wrapped around a mop or alternatively use a terry-cloth mop.
Also, make sure you close the doors and windows to keep dust contained in the room you are working on.
1. Sanding
The next step is removing the impaired surface in a process called sanding. Flooring companies can make use of a walk-behind sander for this task. It has a large rotating drum that uniformly removes the scratched finish- if you operate the sander properly or use the right series of sandpaper grades.
Ideally, you'd want to push the sander over the floor using a slow, uniform pace, to gently grind down the surface to a level that is below any damage or finish treatments. A walk-behind sander is quite difficult to control owing to its size, so it's crucial that you employ it in a way that will leave no dips, rises, or uneven wood patches. The connected vacuum should suck up most (if not all) of the generated dust particles.
Large machines will not be able to fit in tight spaces or sharp corners. Rather, use small hand grinders to refinish these spots. While they are lighter and much more portable, they can be tricky as you have more control and are likely to have more slip-ups. For instance, Onfloor' s 50" Grit Diamabrush Wood Tool 6.5" is designed to remove the most resistant strains from the tightest of spaces, effectively preparing the wood surface for refurbishing. To get the hang of a tool such as this one, try to practice in spaces that will not be entirely visible in the finished area.
Pro Tip: Some wood flooring might be covered in chemical layers for maximum protection, which will be stripped off during resurfacing. In much older homes, these may contain hazardous chemicals. Make sure the target area is properly ventilated before starting, and wear any other protective gear (a.k.a goggles and breathing gear) to protect yourself during the whole process.

Once you're done sanding the floor using commercial grade equipment, you can work on any other remaining spots using soft-grade or medium grade sandpaper depending on the stains. This can additionally help to smoothen out any rough wood patches left unnoticed. For instance, our 36 Grit 6.8" Hook & Loop Sandpaper (Box 50) can prove valuable in any of your hardwood and deck sanding needs.
Note: If gouges are visible, use wood putty to fill up those spaces, which should be left to dry for one day before being sanded with any of Onfloor's medium-grade sandpapers.
Types of Finishes for Wood Flooring
The type of finish you select depends on the look you want to achieve. Flooring companies should also factor in durability when choosing among these three finishes:
- Varnish- It comes in a myriad of lusters, from glossy to matte. The rule of thumb here is the higher the gloss, the more durable the wood floor.
- Polyurethane- Either water-or oil-based, polyurethane comes in different degrees of luster and bears a plastic-like look. Both types of finish yellow or darken the wood, although some latest water-based finishes don't darken as much. While the poly finish is superb for high-moisture and high-traffic areas, it's extremely hard to spot-repair when gouged or nicked.
- Sealer (or Penetrating Sealer) - This offers a more natural finish that brings out the grain. It also provides steady protection, especially when waxed; however, it may darken with time. While it's the easiest of the three to spot-repair, penetrating sealer is the least durable.
Make sure whatever product you use is applied in a thin, uniform layer, without drips or paddles to taint the finished look. If need be, you can sand down or reapply any of these finishes in areas to create a smooth appearance.
2. Polishing
Before you resurface the wood floor, place a new cleaner in the vacuum and sweep off the sanded particles via a felt-bottomed attachment. Flooring strips should guide the entire process. Sweep across them to eliminate any dust trapped inside boards. To attain a polish-ready surface, tack the floor using a dry microfiber cloth.
Pro Tip: Don't inundate the wood with liquid, and avoid letting any water pool. If possible, make use of several tack-cloths to remove every speck of debris before you proceed.
When polishing the floor to shine, begin in the back corner of a specific room. Plot a path that ends up near an exit; it's best to follow the designated strips to avoid mistakes. Flooring companies should consider a flat-surface mop for this procedure. The tool works by straining the polish back and forth (mostly in the direction of the wood grain), which helps to smooth out any air bubbles.
Work in tiny areas (about 3-5 feet wide on either side) to ideally control the amount of polish you've strained. It's best to pour out the finish only as much as it can be rolled out in 10 minutes. Use a long-handled roller to overlap each pass and maintain a wet edge. Roll out the finish across the grain, then with it. After every 10 minutes, brush the polish along the edge, and repeat the same for 10 minutes. Continue until the wood surface is covered. Thin coats typically dry faster than thick coats, but that doesn't mean you hasten the process. Wait for 3 hours before recoating and three weeks before restoring furniture. You can allow light traffic 24 hours after applying the finish to give the wood enough time to dry.
The Bottom Line
Wood floor restoration is as easy as the three steps above. Refinishing your floors has never been simpler! Purchase your new vacuums and sanding tools at Onfloor Technologies to get your flooring project on the roll.
If you'd like to learn more about top-of-the-line flooring equipment, don't hesitate to contact us.

Connect with us
Recent Posts

WANT 10% OFF YOUR FIRST ORDER?

0 comments