

Revamping your garage floor can significantly enhance the overall look and functionality of your space. If you've been considering epoxy coating for your garage floor, you're on the right track. Epoxy coating not only adds a sleek finish but also provides durability and protection against spills, stains, and wear.
However, to achieve a flawless epoxy finish, meticulous preparation is key. In this guide, we'll walk you through ten essential steps to prepare your garage floor for epoxy coating, making the process as smooth as possible.
Why Preparing Your Garage Floor is Crucial
Before we proceed, it's important to understand the significance of proper floor preparation. How well you prepare the surface will greatly affect the end result of your garage floor epoxy coating project.
Any dirt, oil, or imperfections can prevent the epoxy from adhering properly, leading to a subpar finish that may peel or bubble over time. Therefore, taking the time to prepare your garage floor meticulously will pay off in the long run.
Step 1 - Surface Inspection
Start by thoroughly inspecting your garage floor. Look for cracks, stains, or any irregularities that might need attention. This step helps you identify what needs to be fixed before moving forward.
- Cracks and Chips: Mark these areas for repair. Epoxy works best on a smooth, even surface.
- Stains: Oil stains are particularly problematic. Make a note of these spots, as they will require special treatment.
- Uneven Areas: Any high or low spots should be smoothed out for a uniform surface.
Step 2 - Cleaning the Floor
Cleaning is one of the most critical steps in the preparation process.
- Sweeping: Begin by sweeping the entire area to remove loose dirt and debris.
- Degreasing: Use a degreaser to tackle any oil stains. Scrub the affected areas thoroughly.
- Pressure Washing: A pressure washer can effectively remove lingering dirt, grime, and degreaser residue. Allow the floor to dry completely before proceeding to the next step.
Step 3 - Repairing Cracks and Holes
Now that the floor is clean, it's time to address any damages.
- Crack Filler: Use an epoxy crack filler to repair cracks and chips. This ensures the epoxy floor coating has a smooth base.
- Patch Larger Holes: Larger holes may require a concrete patching compound. Follow the manufacturer’s instructions for the best results.
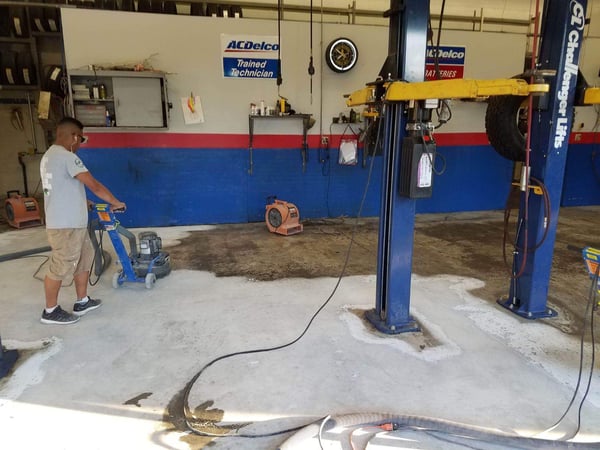
- Smooth Out Repairs: Once the repairs are dry, use a grinder, like the Onfloor's OF16S-H concrete floor grinder, to smooth out the patched areas.
How Can a Concrete Grinder Help Prepare?
A concrete grinder is a versatile tool that can aid in the preparation process. Grinders can help remove any remaining stains or coatings, smooth out rough areas, and prepare the surface for epoxy coating.
Step 4 - Etching the Surface
Etching opens up the concrete pores, allowing the epoxy to adhere to garage floors properly.
- Etching Solution: You can use a concrete etching solution available at most hardware stores. Follow the instructions on the package.
- Applying the Solution: Spread the solution evenly across the concrete garage flooring using a stiff broom.
- Rinsing: Rinse the concrete floor thoroughly to remove the etching solution, then allow it to dry completely.
What is Etching?
Etching is a process of using an acidic solution to roughen up the surface of the concrete, improving its adhesion capabilities. It creates microscopic pores that allow the epoxy to penetrate and create a strong bond with the concrete.
Step 5 - Filling Expansion Joints
Expansion joints are gaps between slabs of concrete that allow for movement without causing cracks. To prevent the epoxy from seeping into these gaps, fill them with a flexible joint filler after etching and before priming.
Step 6 - Checking for Moisture
Moisture is the enemy of epoxy coatings. It can prevent the epoxy from curing properly.
- Plastic Sheet Test: Tape a plastic sheet to the floor and leave it for 24 hours. If there is condensation under the sheet, your concrete is too damp for epoxy application.
- Dehumidifying: If moisture is present, use a dehumidifier to dry the area. You might need to repeat the plastic sheet test to ensure the floor is dry.
Step 7 - Priming
Priming is a critical step that ensures proper adhesion and longevity of your epoxy coating. It also helps to seal the concrete and prevent air bubbles from forming under epoxy garage floors.
- Selecting a Primer: Choose a primer specifically designed for use with epoxy coatings.
- Applying the Primer: Apply the primer using a roller or brush, working in small sections at a time.
- Drying Time: Allow the primer to dry completely before moving on to the next step.
Step 8 - Mixing the Epoxy
Follow the manufacturer's instructions for mixing your epoxy coating. It's essential to mix it thoroughly and avoid any air bubbles.
- Safety First: Wear protective gear, including gloves and a mask, when working with epoxy floor coating.
- Temperature Check: Be mindful of the recommended temperature range for optimal curing of your specific epoxy product.
.jpg?width=600&height=400&name=the-worker-applies-gray-epoxy-resin-to-the-new-flo-2023-11-27-05-08-35-utc%20(1).jpg)
Step 9 - Applying the Epoxy
Now comes the exciting part – applying the epoxy!
- Working in Sections: Start by dividing your workspace into smaller sections. Work on one section at a time to ensure even coverage and prevent the epoxy from drying too quickly.
- Rolling or Spreading: Use a roller or squeegee to spread the epoxy evenly. Keep an eye out for any air bubbles and pop them with a pin.
- Allowing Drying Time: Follow the manufacturer's instructions for drying time, typically 12-24 hours, before applying a second coat if needed.
Step 10 - Adding a Topcoat
Adding a topcoat provides additional protection and creates a glossy finish. It also helps to prevent yellowing or fading over time.
- Selecting a Topcoat: Choose a topcoat specifically designed for use with garage floor epoxies.
- Applying the Topcoat: Apply the topcoat using a roller or brush, following the manufacturer's instructions.
- Final Drying Time: Allow the topcoat to dry completely before walking or driving on the surface. It may take up to 72 hours.
Using Onfloor Concrete Grinders
Integrating Onfloor concrete grinders into your preparation process can make a significant difference.
- Versatility: Onfloor grinders, such as the OF20S-H, are designed for both initial grinding and fine finishing. They can handle everything from surface smoothing to etching, making them indispensable for your project.
- Efficiency: These grinders come with quick tool-changing technology, allowing you to switch between tasks seamlessly.
- User-Friendly: Even if you’re a novice, Onfloor grinders are easy to use and deliver professional results. Their dust collection system also helps keep your workspace clean.
Additional Tips
Here are a few additional tips to keep in mind when preparing your concrete floor for epoxy coating:
- Follow Instructions: Always follow the manufacturer's instructions for any products or equipment used in the process.
- Take Your Time: Rushing through steps and not allowing adequate drying time can result in a failed epoxy coating. Be patient and thorough.
- Maintain Temperature: It's essential to maintain a consistent temperature throughout the application and curing process for optimal results.
FAQs
How long does it take for epoxy garage floor paint to cure?
The curing time depends on the product and environmental conditions but typically ranges from 12-24 hours before a second coat can be applied.
Can I apply epoxy over old coatings or stains?
It's not recommended as the old coating/stain may prevent proper adhesion of the epoxy. It's best to remove any existing coatings before applying epoxy.
Can I add color or decorative elements to my epoxy floors?
Yes, you can add color flakes or other decorative elements to your epoxy coating for a personalized touch. Just make sure to follow the manufacturer's instructions for proper application.
How do I maintain my epoxy-coated floor?
To maintain your epoxy flooring regularly, sweep or vacuum it to remove any debris and mop it with a mild detergent. Avoid using harsh chemicals, as they can damage the coating.
Can I apply epoxy in cold weather?
It's not recommended to apply epoxy in temperatures below 50°F (10°C). The colder temperature can affect the curing process and result in an uneven finish.

Do I need to seal my concrete before applying epoxy?
It is recommended to seal your concrete before applying epoxy for added protection and a smooth surface. However, if your concrete is new and has not been sealed before, you may skip this step.
Can epoxy be used on exterior surfaces?
Yes, there are epoxies specifically designed for outdoor use. Make sure to choose a product suitable for your specific conditions and follow the manufacturer's instructions carefully.
Is it necessary to etch my concrete before applying epoxy?
Etching is essential to ensure proper adhesion of the epoxy and create a strong bond with the concrete surface. Skipping this step can result in an uneven finish and premature peeling or flaking of the coating on your garage flooring.
Conclusion
Proper preparation is crucial for a successful epoxy garage floor coating. By following these 10 steps, you’ll ensure your floor is ready for epoxy, resulting in a durable and long-lasting finish.
By integrating Onfloor concrete grinders into your preparation process, you can enhance efficiency, achieve professional results, and make your project more manageable. Don’t wait—transform your garage floor today and enjoy the benefits of a beautifully coated, durable surface.
Ready to start your project? Visit Onfloor to explore our range of concrete grinders and find the perfect machine for your needs.
Connect with us
Recent Posts

WANT 10% OFF YOUR FIRST ORDER?

0 comments