

Imagine stepping outside to enjoy your morning coffee on a beautifully restored wooden deck, free of splinters and full of charm. For homeowners and contractors, maintaining a wooden deck is essential not only for aesthetics but also for safety and longevity. Over time, exposure to the elements can cause wooden decks to wear out, leading to faded colors, warped boards, and even potential hazards.
In this comprehensive guide, we will explore practical steps to bring your deck back to life, with a special emphasis on the role of concrete floor grinders in the restoration process. Whether you’re a homeowner eager to revamp your outdoor space or a contractor looking to deliver top-notch results, read on to discover how you can restore wooden decks with ease and efficiency.
Understanding Wooden Deck Wear and Tear
Wooden decks add a rustic charm to any home, but they also face constant exposure to sun, rain, and foot traffic. Over time, this exposure leads to fading, surface damage, and weakened structural integrity. A weathered deck can show signs of wear, cracking, and discoloration due to exposure to the elements. Understanding the signs of wear and tear is the first step toward effective restoration.
Homeowners might notice discoloration, splinters, or loose boards, which are early indicators that it’s time for a makeover. Maintaining an old wood deck can be challenging, but proper maintenance can prolong its life. Contractors, on the other hand, should look for more subtle signs like minor warping or moisture damage that can escalate if left unchecked. By recognizing these early signs, you can plan your restoration project effectively and prevent further deterioration.
Initial Assessment Before Restoration
Before you start the restoration process, it’s crucial to perform a thorough assessment of your deck’s condition. This involves checking for structural issues like rot, loose nails, or damaged boards. Additionally, inspect the deck's surface for cosmetic damage and ensure it is clear of debris.
For homeowners, a careful visual inspection can help identify areas that need attention. Contractors might use specialized tools to assess the depth of damage and determine the best approach for repair. It is also important to inspect and repair any damaged decking boards as part of the assessment. By conducting a detailed assessment, you can prepare adequately for the restoration process, ensuring that no issues are overlooked and setting the stage for a successful transformation.
Gathering Essential Tools and Materials
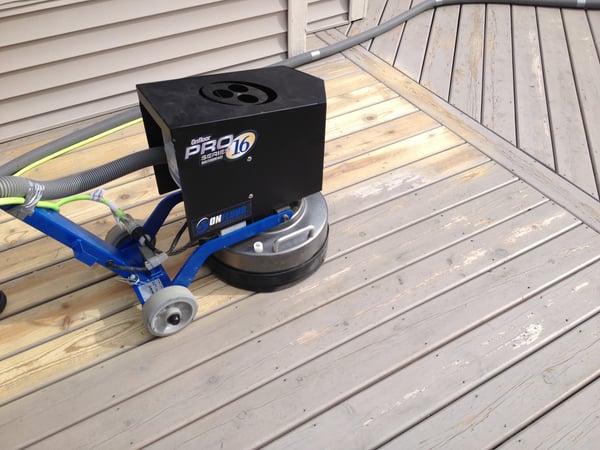
Restoring a wooden deck requires a specific set of tools and materials to achieve professional results. Among these, concrete floor grinders stand out as an essential tool in the restoration arsenal. Onfloor grinders, in particular, offer quick-change tooling systems that allow for multiple applications, making them highly versatile and efficient. Our ergonomic grinders are perfectly sized for deck restoration projects, enabling users to tackle surface imperfections with ease.
Additionally, a power washer is crucial for thoroughly cleaning the deck before starting the restoration process, ensuring all dirt and cleaning solutions are rinsed off properly. Alongside floor grinders and power washers, you’ll need items like safety goggles, brushes, sealant, and wood stain. Having these tools on hand ensures a smooth and effective restoration process, whether you’re a DIY enthusiast or a seasoned contractor.
The Role of Concrete Floor Grinders in Deck Restoration
Concrete floor grinders are not just for concrete floors; they play a pivotal role in restoring wooden decks too. These powerful machines help remove old finishes, smooth out rough surfaces, and prepare the wood for staining.
Using an Onfloor grinder with a quick-change tooling system streamlines the process, allowing you to switch between applications with a single grinder effortlessly. This versatility makes Onfloor floor grinders invaluable for achieving an even and polished deck surface. Homeowners and contractors alike will appreciate the efficiency and precision that these grinders bring to the restoration process, ensuring that every inch of the deck is smooth and ready for the next step.
Cleaning the Deck
Cleaning the deck is an essential step in the deck restoration process. It removes dirt, grime, and old finishes, preparing the surface for new treatments. Start by clearing the deck of any furniture, plants, or debris to create a clean working area.
Using a pressure washer is highly effective for deep cleaning. To loosen any dirt and debris, begin by spraying the deck boards with water. Then, apply a deck cleaner or a mixture of mild detergent and water to the entire deck. Be sure to also use a stiff bristle brush to scrub the surface, paying special attention to areas with heavy staining or mold.
After scrubbing, rinse the deck thoroughly with the pressure washer, ensuring all cleaning solution is removed. Allow the deck to dry completely before moving on to the next steps. Proper cleaning not only enhances the appearance of your deck but also ensures that new finishes adhere properly, resulting in a longer-lasting restoration.
Repairing Damaged Boards
Once the surface is prepared, it’s time to repair any damaged areas on the deck. Identify and replace rotten or severely damaged boards, securing them with appropriate fasteners. For minor repairs, such as filling cracks or holes, use high-quality wood filler.
Contractors may rely on concrete floor grinders to evenly sand down repaired areas, ensuring a consistent surface texture. It is important to sand in the direction of the wood grain to ensure even coverage and prevent damage. This step is crucial to maintaining the structural integrity of the deck and providing a seamless appearance. By addressing all damaged areas, you’ll ensure a safe and attractive deck that stands the test of time.
Choosing the Right Stain or Sealant
Selecting the right stain or sealant is essential for protecting your restored deck and enhancing its natural beauty. Consider factors such as climate, wood type, and the desired color when making your choice. Oil-based stains offer deep penetration and rich color, while water-based options dry quickly and provide easy cleanup.
By using a concrete floor grinder, you ensure that the surface is impeccably prepared. This allows the stain or sealant to penetrate evenly. By choosing the appropriate product, you can safeguard your deck from future wear and tear, preserving its appearance and functionality for years to come.
Applying the Stain or Sealant
Application is a critical step in the restoration process, requiring attention to detail and patience. Begin by ensuring the deck is thoroughly dry before applying the stain or sealant. Use a brush or roller to apply an even coat, following the grain of the wood. For best results, consider using a sprayer for larger decks to achieve uniform coverage.
Allow ample drying time before applying additional coats if needed. Again, by utilizing a concrete floor grinder during preparation ensures a smooth surface, allowing the stain to adhere beautifully. This careful application protects your deck and enhances its visual appeal, making it a favorite spot for family gatherings and relaxation.

Maintaining Your Restored Deck
After completing the restoration process, regular maintenance is vital to keeping your deck in top condition. Clean your deck periodically to remove dirt and debris, using a mild detergent and water. Inspect the deck for any signs of damage or wear, addressing issues as they arise.
Using a concrete floor grinder like Onfloor for periodic touch-ups can extend the life of your deck, ensuring a consistently smooth and attractive surface. By incorporating these maintenance practices into your routine, you can enjoy a beautiful and functional deck year-round, adding value and enjoyment to your outdoor space.
Additional Tips and Tricks for Restoring Your Deck
Here are some additional tips and tricks to help you achieve a professional-quality deck restoration:
- Safety First: Always follow safety guidelines when working with power tools and chemicals. Wear protective gear, including safety goggles and gloves, to protect yourself from potential hazards.
- Application Techniques: Use a paint roller or brush to apply stain or paint, working in sections to maintain even coverage. This ensures a smooth and uniform finish.
- Wood Brightener: Consider using a wood brightener before staining to restore the vibrance and luster of the wood. This step can make a significant difference in the final appearance of your deck.
- Deck Sealant: Apply a deck sealant to protect the wood from the elements. Sealants help prevent moisture damage, UV fading, and other environmental wear and tear.
- Multiple Thin Coats: Apply multiple thin coats of stain or sealant rather than one thick coat. This allows for better penetration and coverage, resulting in a more durable finish.
- Protect Surrounding Areas: Use drop cloths to protect surrounding areas such as plants, furniture, and siding while staining. This prevents accidental spills and splatters.
By following these tips and tricks, you can achieve a stunning and long-lasting deck restoration that enhances your outdoor space.
Common Challenges and Solutions
Here are some common challenges you may encounter during deck restoration and their solutions:
- Damaged Boards: If you find damaged boards, replace them with new ones. Ensure they are securely fastened to the deck frame to maintain structural integrity.
- Old Paint: Removing old paint can be challenging. Use a paint stripper to remove old paint, and then sand the surface to smooth out any rough spots. This prepares the deck for a fresh coat of paint or stain.
- Weathered Wood: Weathered wood can lose its vibrance and luster. Use a wood brightener to restore the wood’s natural beauty, and then apply a sealant to protect it from future weathering.
- Mold and Mildew: Mold and mildew can be persistent problems. Clean the deck with a mild detergent and water to remove mold and mildew. After cleaning, apply a mold and mildew-resistant coating to prevent future growth.
By addressing these common challenges with effective solutions, you can ensure a successful deck restoration that enhances both the appearance and durability of your outdoor space.
.jpg?width=600&height=450&name=OF16%20Pro%20Deck%20Brush%202ct%20semi%209%20(1).jpg)
FAQs
Q: Can I use a concrete floor grinder for deck restoration on any type of wood?
A: Yes, an Onfloor grinder can be used on all types of wood, including cedar, pine, and redwood decks.
Q: How long does it take to restore a deck using a concrete floor grinder?
A: The time it takes to restore a deck will depend on the size and condition of the deck. However, using an Onfloor grinder significantly speeds up the process compared to traditional sanding methods.
Q: Can I stain or seal my deck immediately after using a concrete floor grinder?
A: It's recommended to wait at least 24 hours before staining or sealing a deck after using a grinder to allow the wood fibers to settle and dry completely.
Q: Can I use a concrete floor grinder for both surface preparation and finishing?
A: Yes, Onfloor grinders are versatile tools that can be used for both preparing and finishing surfaces, making them an ideal choice for deck restoration projects.
Conclusion
Restoring a wooden deck is not just about improving aesthetics; it's about creating a safe and inviting space for relaxation and entertainment. By following these steps and utilizing essential tools like concrete floor grinders, homeowners and contractors can transform worn-out decks into stunning outdoor retreats.
Remember to assess your deck's condition, prepare and repair surfaces meticulously, and choose the right stain or sealant for lasting protection. With regular maintenance and a proactive approach, your deck will remain a cherished part of your home for years to come.
Looking for the best concrete floor grinder for your deck restoration project? Explore our range of grinders and other surface preparation equipment today.
Connect with us
Recent Posts

WANT 10% OFF YOUR FIRST ORDER?

2 comments