

The OF16Pro and the OF20Pro are highly efficient machines equipped with Onfloor’s patented triple-belt planetary technology. When the time comes that the belt wears, then it's time to change the belts. By knowing how to change the belt by yourself, you can save time and money than waiting for a technician to repair it for you. These machines are designed to be user friendly and easy to be repaired.
what you can expect to learn from this episode:
- How and why most belts get broken
- Measures you can take to avoid breaking a belt
- And I will give you a step by step visual on replacing a belt.
HOW AND WHY MOST BELTS GET BROKEN
- Studs that previously held machines, walls and etc…
- Expansion joints/cracks that have a ledge that is greater than 1.8”
- Removing glue, epoxy or overlay
- Add too much weight
PREVENTIVE MEASURES YOU CAN TAKE TO AVOID BREAKING BELTS
- Inspect the job for studs, joints and cracks
- Use a vacuum that has the recommended CFM
- Clean out inner bowl area regularly

Belt Replacement Process Step by step
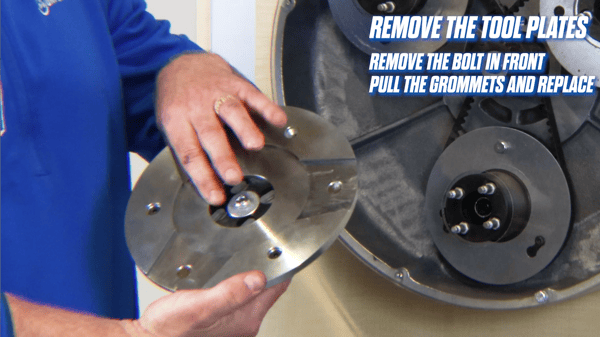
remove the tool plates
- Remove the bolts in front of the tool plate
- Pull the grommets and replace
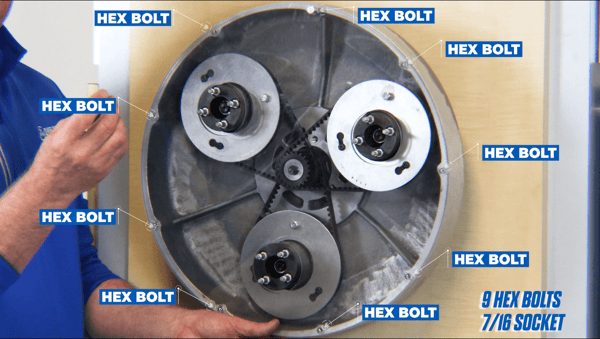
remove the dust cover
- Unscrew the Hex Bolts. There are 9 Hex Bolts of 7/16 socket.
- Take the dust cover off after the bolts are out.
remove the belt retainer plates
- There are 3 Retainer Plates and a Hex Bolt of 5/16 socket holding it. Just unscrew the bolts.
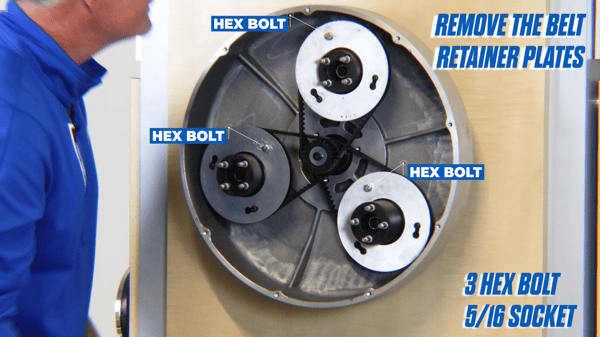
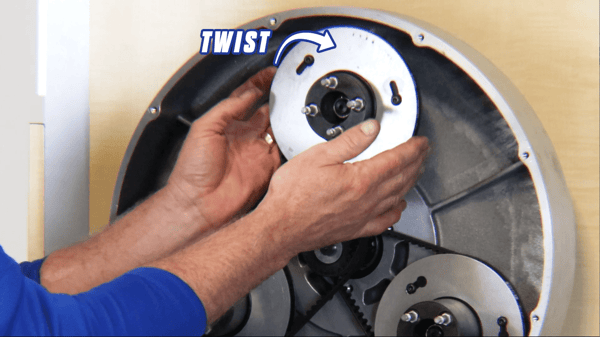
- The Retainer Plates has a Key Hole system. Just twist them to their hole and you can easily remove them.
remove the belts
There are 3 stacks of belt. The High, Mid and Low. The belts are stacked and you may have to remove a good belt to get the location of the broken one.
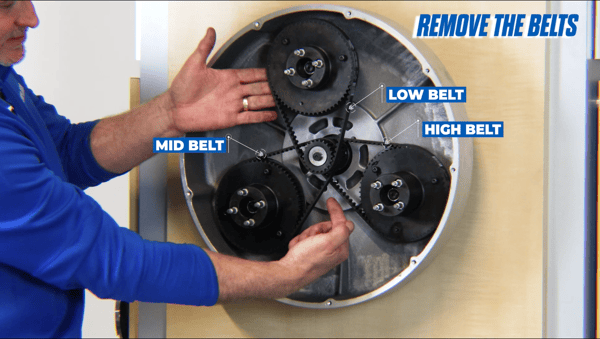
- Remove the belts starting from Low, Mid then High.
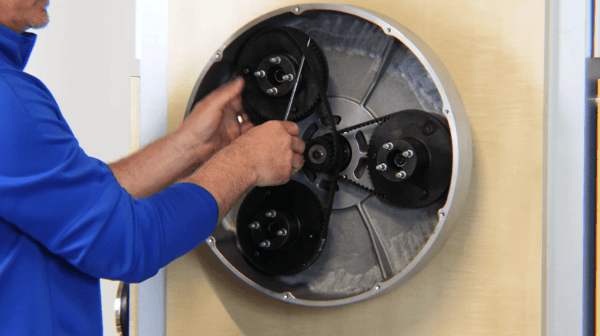
- To remove the belt, simply put your finger behind the belt and turn the pulley as you pull the belt out.
- You can also use a screwdriver under the belt and pull the belt out while you turn the pulley.
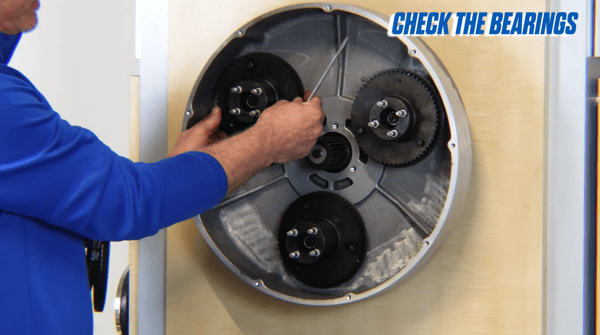
- It's also wise to check the bearings.
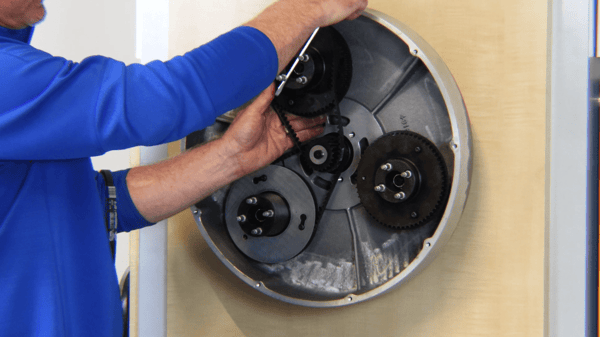
install the belts
- Install the belts starting from High, Mid then Low.
- Wrap the belt around the center pulley first, then wrap it on the back side of the outer pulley.
- Then simply twist the pulley until the belt rolls off.
- Push the belt unto the pulley and align it.
- Put back the retainer plates
- Install the dust cover.
You are all set!
If you feel that there is something wrong with your equipment and you can't follow through the steps, you can always contact Onfloor so we can help you out.
Now that you know how you change the belts of an Onfloor OF16 Pro and OF20 Pro, you can also check our post about choosing the right sealer for your concrete floor to know more about sealing your concrete floor, or is it really necessary to seal it. You can also check our online store and compare products and find what suits you best.
you can also check the full video of the tutorial here:
TRANSCRIPTION - HOW TO CHANGE THE BELTS ON AN ONFLOOR OF16Pro and OF20Pro
Hi, I'm Travis McCutchen from Onfloor Technologies. I'm Coming to you from our training center in Tulsa, Oklahoma. I thank you for joining us for our first episode of Onfloor Fast and Easy Tech Tips.
Today, I'm going to show you how to change the belts in the Onfloor 16" and 20" machines. We're going to use our fancy little display system that we created for our training center here in Tulsa at eye level so you get a good visual on how to remove the belts and how to replace them. What you can expect to get out of this video is how are belts broken, how to prevent belts from getting broken, and how do we replace belts?
So, how belts get broken, the number one reason I would say would be related to studs that we find in the floor, studs left behind from a tool, a piece of equipment that's been bolted down to the floor, or a wall that's been bolted down to the floor. These are usually larger than 3/8" round and create a damaging impact to the tool. The other reason, the next reason how belts get broken would be related to cracks and or expansion joints that have a rise that's greater than 1/8". That's going to create a real heavy impact. The third reason how belts get broken would be putting too much weight on the machine in an effort to remove something really difficult, or just grinding a really deep grind.
How do we prevent belts from getting broken? The number one reason would be inspect the job. If you walk the job, make sure you don't have any studs, and identify those areas in the cracks and/or the expansion joints that have a rise of more than 1/8" and plan to grind that ride, that high side of that crack or expansion joint. And then the third way to prevent belts from getting broken is if we keep dust out of this inner bowl chamber. How do you do that? We simply connect a vacuum that provides adequate CFM, and number two, clean this chamber out periodically.
Now I'm going to go through the process of showing you step by step how to remove the belts and then re-install them. First, you got to remove your tool plates. Our tool plates are very simple to remove with the Onfloor patented system, and our tool plates come with four grommets that are replaceable grommets. Just simply remove the bolt in front, pull the grommets, and replace them.
Next we're going to remove the dust cover. We have a clear dust cover here for demonstration purposes. This dust cover has, in either machine case, you have got nine 1/4"-20 bolts that require a 7/16" socket to remove. So, get that dust cover off of there, and then the next step would be to remove the belt retainer plates. Now to remove these 7/16" bolts on either machine, I like to use a breakover if I don't have a drill.
The reason why I like to use the breakover is so you can break the bolt and then unscrew it like a screw. It's a lot faster and a lot easier. We'll take all of those off at once. And the first thing you have to remove to get the belts off is this retainer plate. This belt retainer plate, it's new. We've had these out for about a year now. If you've got an older machine, you can buy an upgrade kit for these retainer plates. And removing that belt retainer plate with the new one is just simple. It's got a keyhole system, and just simply turn that to the bigger hole, after you've taken that hex bolt out, and away comes the plate. Compared to the older ones, huge time saver, as long as you can line the hole up.
The next step in removing the belts will be to remove the outer belt first. We call this the lower belt, this is the mid-belt, and this is the high belt, and that's because they're in sequence here. To remove the belt, you simply put your finger behind that belt and turn the pulley, or in the 16" machine, because this connection here is a lot closer, you may need to get a screwdriver, put it under the belt. Simply pull the belt up and roll it off of the pulley. And we'll take one belt off at a time using that same technique, and there, the belts are off, very fast, very easy.
At this moment, it would also be very wise to check your bearings, so you can just grab the other side of the pulley and check for play in the bearings in these posts, and then we're going to reinstall the belts. Reinstalling the belts, we're going to do it in reverse order. Of course, the high, medium, and then the low. If you did it any other way, you couldn't get all the belts on, so we're going to wrap that belt around the center pulley first, and then wrap it around the backside of the outer pulley, and then simply twist the pulley until it rolls on. You'll need to push that belt onto the pulley so that you can get your belt retainer plate back on without any issues.
And we'll go to the next one. Now, on the 16" machine, because these are in closer proximity, you may need some extra torque to turn the pulley to get the belt on, so I'll demonstrate that here. You just simply take your screwdriver and put it in between the pins and roll the belt on. And then again, you're going to push the belt on to the pulley before you put your belt retainer plate on, and go to the next one. Again, putting the belt on the center pulley first, and then we're rolling the belt on. Again, on the 16" machine, you may need torque, like I'm using the screwdriver over here in between the bins. Get the belt up onto the pulley, your retainer plate on, and then put your hex bolts in, re-install your dust cover, and you're done.
So thank you for joining us today for our first episode of Onfloor's Fast and Easy Tech Tips. If you got some information out of this video today that's helpful for you, we invite you to hit the Like button and the Subscribe button below.

Connect with us
Recent Posts

WANT 10% OFF YOUR FIRST ORDER?

2 comments