

A bolt-on sander pad is very durable and it doesn't wore off easily. It can take hard hits. But this sander pad has it's own lifetime and when it comes a time that it needs to be replaced, you don't need to send it back to us. Replacing the sander pad of a bolt on OnFloor OF16S EZV Sander can be done by yourself. Follow through this article and you will know how to replace a bolt-on sander pad.
Needed Tools
9/16" Socket Wrench / Drill and Blue Loctite
For this procedure, you will need to 9/16th inch socket wrenches, a drill with a 9/16th inch socket, blue loctite or loctite 242, the washers and bolts from the used sander pad and replacement sander pads.


REPLACE A BOLT-ON SANDER PAD ONFLOOR OF16S EZV SANDER
Before we start, please make sure the machine is not plugged into the power source, utilize the lockout tagout procedure and refer to the EZV manual.
Reposition the handle
To begin working, pull the pin out of the handle. Reposition the handle to the upright position. Reinstall the pin and then lay the machine back and rest it on the floor.

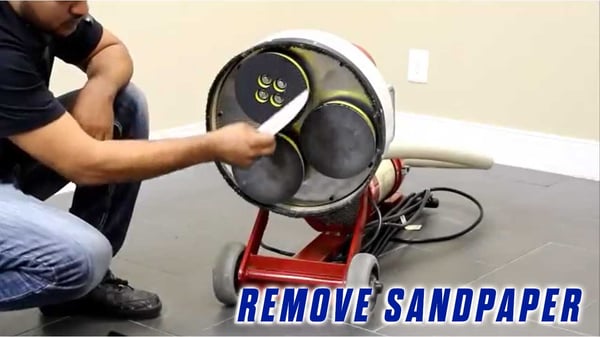
Remove the sandpaper
First, remove the sandpaper from the sander pads.
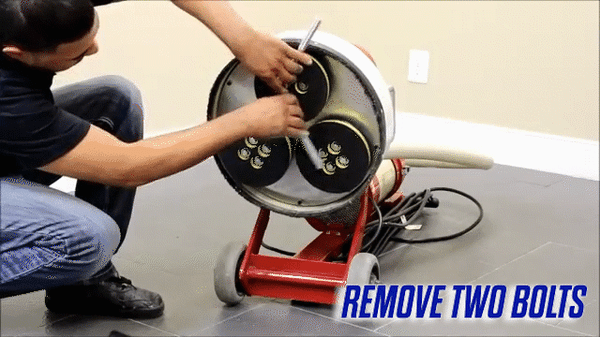
remove the bolts
Remove two bolts with the two socket wrenches. The three sander pads rotate freely, so you may need to create some leverage in order to remove the bolts.
We create this leverage by making sure that the two wrenches are set in opposite positions, one clockwise and one counter clockwise. This will prevent the rotation while the bolts are being removed.
Remove the last sander pad
After the two sander pads have been removed, hand tighten two bolts back into place without the sander pad, then place the end of the rubber mallet or the long screwdriver between the bolts.
This should hold the sander plate in place while removing the remaining bolts.

Now you can remove the two hand tightened bolts from the plate. Be sure to keep all hardware, you'll need it to reattach the new pads.
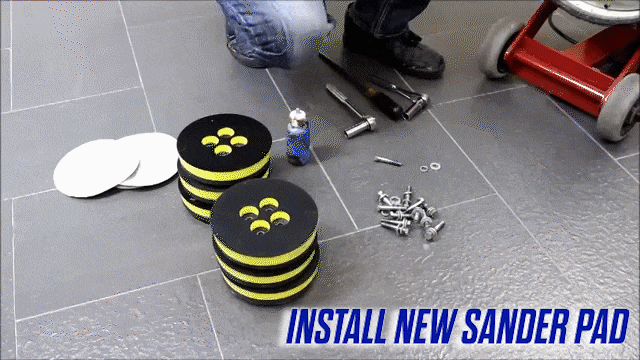
install new sander pad
Insert a washer, a lock washer, and a bolt into a new pad and apply a few drops of blue loctite to the bolt threads.
Place the pad onto the plate and hand tighten the bolt. Then do this with the remaining three bolts and washers.
tighten the bolts
Now tighten all four bolts on this pad with a 9/16th inch socket wrench. You may need to use the other wrench to hold the sander plate in place while tightening the bolts.
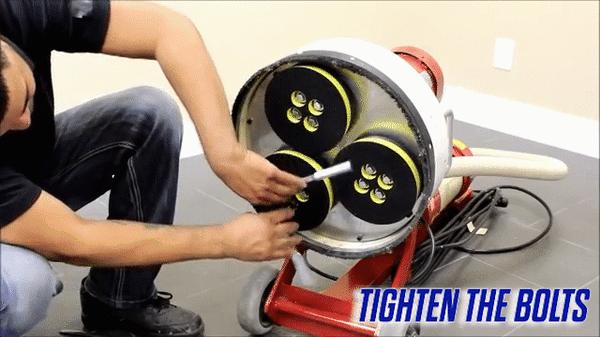
Continue until all three pads have been reattached and tightened, then you're ready to get to work.
If you feel that there is something wrong with your equipment and you can't follow through the steps, you can always contact Onfloor so we can help you out.
Now that you know how to replace a bolt on sander pad on an OnFloor OF16S EZV Vacuum Sander, you can also check our article in removing ceramic tiles from concrete floors because if you’re looking to lay down new flooring or expose your concrete sub-floor, you’ll first want to scrape off the old tile.. You can also check our online store and compare products and find what suits you best.
YOU CAN ALSO CHECK THE FULL VIDEO OF THE TUTORIAL HERE:
TRANSCRIPTION - Replace a Bolt-On Sander Pad Onfloor OF16S EZV Sander
This instructional video will show you how to replace a Bolt-on Sander Pad on an EZV sander.
For this procedure, you will need to 9/16th inch socket wrenches, a drill with a 9/16th inch socket, blue loctite, the washers and bolts from the used sander pad and replacement sander pads.
Before we start, please make sure the machine is not plugged into the power source, utilize the lockout tagout procedure and refer to the EZV manual.
To begin working, pull the pin out of the handle. Reposition the handle to the upright position. Reinstall the pin and then lay the machine back and rest it on the floor.
First, remove the sandpaper from the sander pads.
Then remove two bolts with the two socket wrenches. The three sander pads rotate freely, so you may need to create some leverage in order to remove the bolts.
We create this leverage by making sure that the two wrenches are set in opposite positions, one clockwise and one counter clockwise. This will prevent the rotation while the bolts are being removed.
After the two sander pads have been removed, hand tighten two bolts back into place without the sander pad, then place the end of the rubber mallet or the long screwdriver between the bolts like this.
This should hold the sander plate in place while removing the remaining bolts.
Now you can remove the two hand tightened bolts from the plate. Be sure to keep all hardware, you'll need it to reattach the new pads.
Insert a washer, a lock washer, and a bolt into a new pad. Apply a few drops of blue loctite to the bolt threads.
Place the pad onto the plate and hand tighten the bolt. Then do this with the remaining three bolts and washers.
Now tighten all four bolts on this pad with a 9/16th inch socket wrench. You may need to use the other wrench to hold the sander plate in place while tightening the bolts.
Continue until all three pads have been reattached and tightened, then you're ready to get to work.

Connect with us
Recent Posts

WANT 10% OFF YOUR FIRST ORDER?

4 comments